为了简化React的Flux带来的冗余操作,社区的同仁们给我们带来了很多优秀的轮子,诸如Redux,Reflux等。今天我们就通过逐行讲解代码实例的方法,感受一番Reflux的设计之美。
例子
这个例子是非常简单的todo例子,学习语言从helloworld开始,学习框架从todo开始,这是我们码农界的文化传统!
组件
components/todo.js
1 | import React from 'react' import Reflux from 'reflux' import ReactMixin from 'react-mixin' import store from '../stores/store' import actions from '../actions/actions' export default class Todo extends React.Component{ //组件渲染完成后,通过action获取所有的数组,刷新绑定到this.state上 |
上述代码,我们干了3件事:
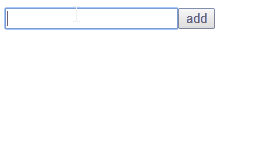
- 渲染了一个组件,这个组件包括一个
input,一个add按钮,一个列表,列表每项包含名称和remove按钮 - 给这个组件添加了几个方法,其中
componentDidMount()在组件渲染完成后触发,componentDidMount()、add()和remove()方法分别调用actions的方法去更新状态 - 最后一行代码,使用es6的mixin写法,使得组件监听store带来的state变化,并刷新界面。
看到这里,很多没有接触过Reflux的同学可能已经晕了,我来图解下Reflux的功能流程吧!
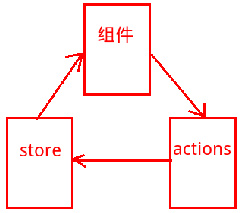
组件就是用户界面,actions就是组件的动作,store用于执行actions的命令,并返回一个state对象给组件。组件通过state来更新界面。
这里我想说说React和Angular的某个相同之处,就是将数据和界面绑定起来,通过操作数据来更新界面(不用苦逼的操作dom了)。我们把数据和界面的规则建好后,更新数据,界面自动就变化了。在这里,数据指的是this.state,界面指的是组件。
那么为何要用actions和store这么多层去更新state呢?为了以后项目业务逻辑变复杂后便于管理。为什么便于管理,因为actions有很多钩子,钩子就是“触发之前,触发之后的回调什么的”,这些钩子我们以后会用得上。
actions和store两个好基友开始更新状态
actions/actions.js
1 | import Reflux from 'reflux' export default Reflux.createActions(['getAll','add','remove']); |
stores/store.js
1 | import Reflux from 'reflux' import actions from '../actions/actions' |
上述代码,我们干了3件事:
- 给数组对象的原型添加一个remove的方法,用于删除指定下标的元素
- 创建一个store,监听actions的方法
- 在store里,on开头的都是actions对应的回调函数,this.trigger(),负责更新state(这里指的是{list:this.items}这个对象)
渲染组件
index.js
1 | import React from 'react'; |
最后,用webpack编译
webpack.config.js
1 | var path = require('path'); var webpack = require('webpack'); |
总结
相比较Redux而言,
- Reflux没有reducer的概念,取而代之,和action做基友的是store
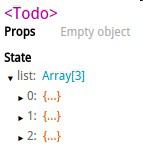
- Reflux没有把状态的一部分值绑定在组件的props上,而是将状态绑定在组件的state上,我们来看react dev tool的截图
- Reflux可以直接调用action的方法,而Redux必须将方法绑定在组件的props上,或者使用props的dispatch方法来执行actions的方法
- ……
由此看来,Reflux好理解的多,但是Redux的单一state是实际项目中是非常好用的,所以,Redux在Github上的星星比Reflux多得多!两个都是社区同仁智慧的结晶,都是优秀的值得学习的轮子!
源代码:
https://github.com/lewis617/react-redux-tutorial/tree/master/todo-reflux
运行方法:
1 | npm install |
手动打开index.html